RentalManager — Property Management Software
Track repairs, expenses, mileage, receipts, and documents across your entire rental portfolio. Built for landlords and property managers who want a simple, self-hosted solution with real tax-time value.

Features Overview
🏠 Properties & Units
Manage any number of rental properties, each with one or more units. Track the tenant name, rent amount, and occupancy status per unit. Soft-delete keeps historical data intact when a property is retired.
🔧 Repairs
Log repair requests against any unit with a title, category (Plumbing, Electrical, HVAC, Appliances, Structural, Roofing, Flooring, Painting, Landscaping, Pest, Other), priority (Low → Emergency), and estimated/actual cost. Status progresses through Open → In Progress → On Hold → Completed / Cancelled — and the completion date is stamped automatically.
Filter the list by property, status, or priority. Use the inline search to find any repair by title, category, or vendor.
💰 Expenses & Receipts
Record every property-related expense with a vendor name, payment method, amount, and tax-deductibility flag. Attach one or more receipt images or PDFs per expense — files are stored on the server and viewable inline or downloadable. Filter by property, category, and year.
Supported expense categories: Repairs, Materials, Labor, Utilities, Insurance, Property Tax, Mortgage, HOA Fees, Management, Advertising, Legal, Accounting, Supplies, Other.
🚗 Mileage Log
Log every property-related drive with start/end location, trip date, and purpose. Check “Round Trip” and the app doubles the mileage automatically. The IRS standard rate ($0.70/mile for 2024) is built in — your tax deduction is calculated on every entry and summarized per year and per property.
📁 Documents
Upload photos, PDFs, Word documents, spreadsheets, and text files (up to 50 MB each). Tag documents to a property, unit, repair, or expense. Add free-form tags (e.g. roof, 2024, permit) for easy retrieval. Images appear in a visual photo grid; non-image files appear in a sortable table.
Supported categories: Photo, Receipt, Contract, Lease Agreement, Inspection, Permit, Insurance, Invoice, Other.
📊 Reports
Year-end tax & expense summaries in a single view. Select a tax year (and optionally filter by property) to see:
- Total miles driven, IRS deduction amount, trip count, and a per-property breakdown
- Total expenses, tax-deductible total, and an expense breakdown by category
- A combined “Total Estimated Deductions” banner you can hand directly to your accountant
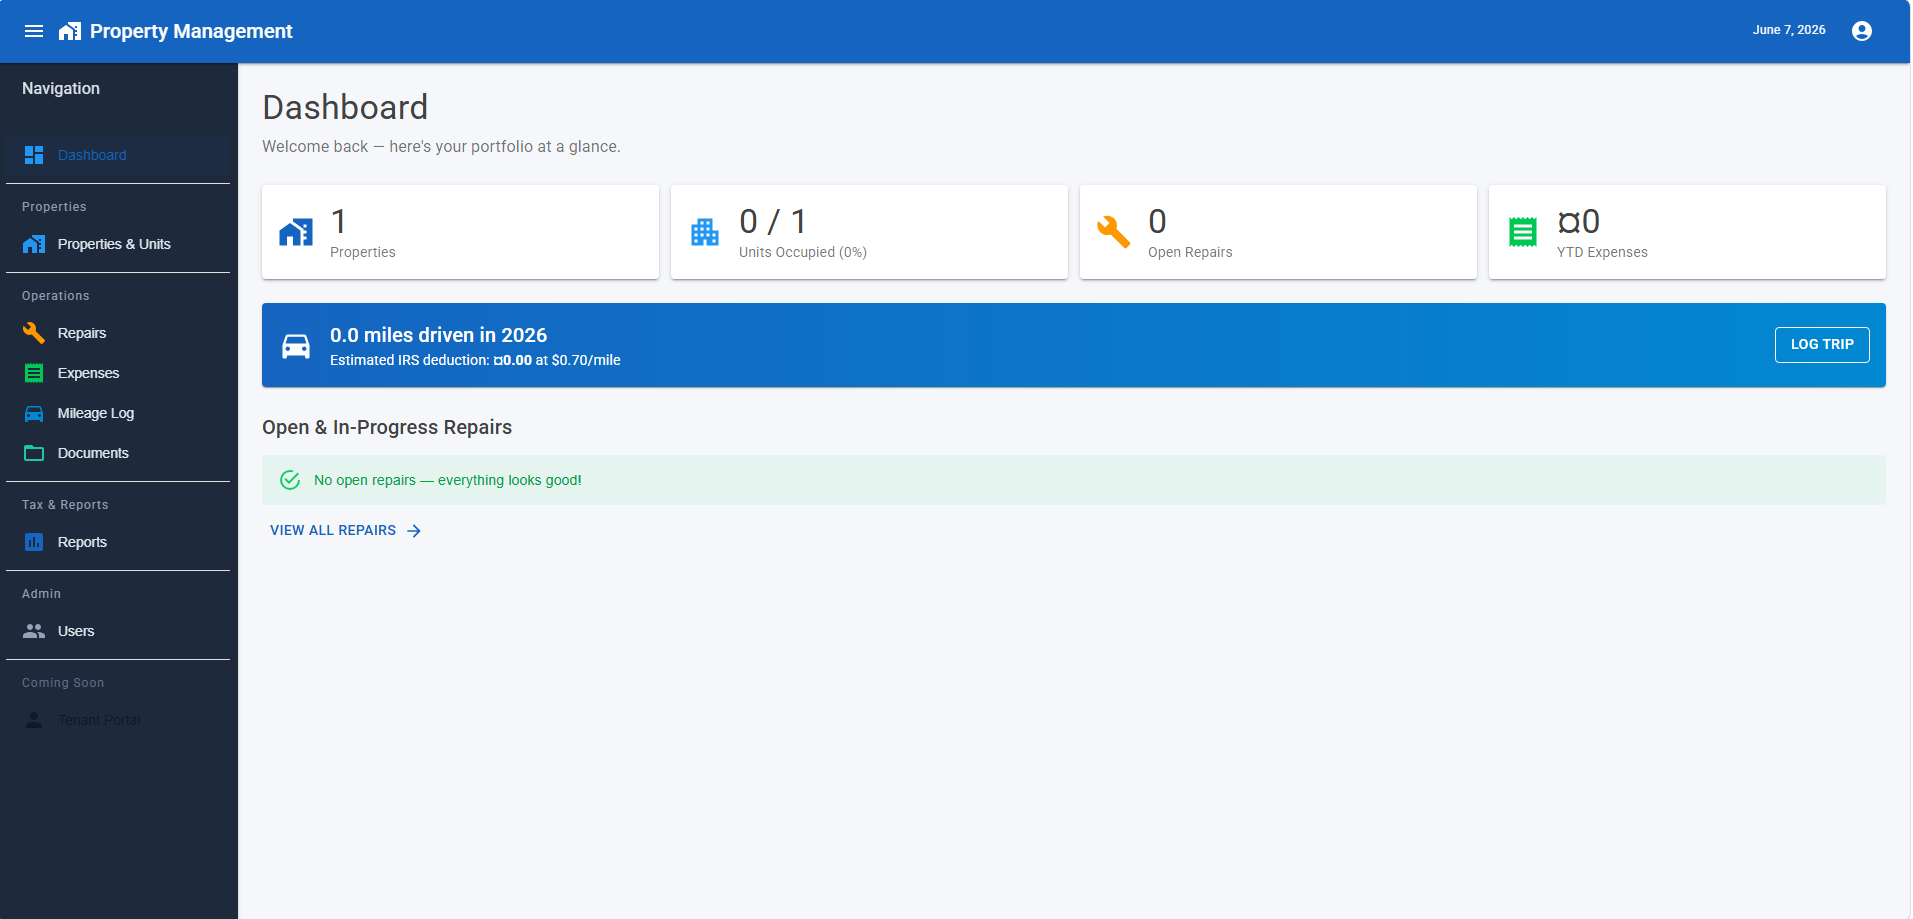
📊 Dashboard
At-a-glance summary cards for total properties, occupied/total units (with occupancy rate), open repairs (with emergency count highlighted), and year-to-date expenses. A mileage banner shows YTD miles and estimated IRS deduction. The dashboard also lists all open and in-progress repairs so nothing slips through.
License Tiers
Starter
- Properties & Units
- Repairs
- Expenses & Receipts
- Dashboard
Professional ★
- Everything in Starter
- Mileage Log
- Documents
- Tax & Expense Reports
Enterprise
- Everything in Professional
- Tenant Portal (coming soon)
- Priority support
System Requirements
Server / Host Machine
- .NET 9 Runtime (or SDK) — download from Microsoft
- Windows 10/11, Windows Server 2019+, or any 64-bit Linux distribution supported by .NET 9
- 500 MB free disk space for the application; additional space for uploaded receipts and documents
- No external database server required — SQLite is embedded
Browser
- Any modern browser: Chrome 90+, Edge 90+, Firefox 90+, Safari 15+
- JavaScript must be enabled (required for Blazor Server)
Installation
Option A — Run from Source (Recommended for Evaluation)
-
Install the .NET 9 SDK
Download and run the installer from dotnet.microsoft.com. Verify with:dotnet --version # Should print 9.x.x -
Download or clone the repository
Or download and extract the ZIP release from the Releases page.git clone https://github.com/your-org/RentalManager.git cd RentalManager -
Build and run
Use the included helper script:
This runs# PowerShell .\run.ps1dotnet clean → dotnet build → dotnet run. On first launch the SQLite database (RentalManager.Web/rental_manager.db) is created automatically. -
Open in your browser
Navigate tohttps://localhost:5001(or the URL printed in the console). You will be redirected to the first-run setup wizard.
RentalManager.Web/rental_manager.db before restarting. The app recreates the database automatically on next launch.
Option B — Self-Hosted Deployment (IIS on Windows)
-
Install the .NET 9 Hosting Bundle on the server. This includes the runtime and the IIS module.
Restart IIS after installation:iisreset -
Publish the application
dotnet publish RentalManager.Web -c Release -o C:\inetpub\RentalManager -
Create an IIS site pointing to
C:\inetpub\RentalManager. Set the application pool to No Managed Code. - Set folder permissions — grant the IIS app pool identity Modify access to the publish folder so the app can write the SQLite file and uploaded files.
- Configure HTTPS — bind an SSL certificate to the site in IIS Manager (Let’s Encrypt via Certify the Web is a free option).
- Browse to your domain — the first-run setup wizard will appear.
Option C — Self-Hosted Deployment (Linux / Systemd)
-
Publish to the server:
dotnet publish RentalManager.Web -c Release -r linux-x64 --self-contained -o /opt/rentalmanager -
Create a systemd service unit at
/etc/systemd/system/rentalmanager.service:[Unit] Description=RentalManager After=network.target [Service] WorkingDirectory=/opt/rentalmanager ExecStart=/opt/rentalmanager/RentalManager.Web Restart=always RestartSec=10 User=www-data Environment=ASPNETCORE_ENVIRONMENT=Production Environment=ASPNETCORE_URLS=http://localhost:5000 [Install] WantedBy=multi-user.target -
Enable and start:
sudo systemctl enable rentalmanager sudo systemctl start rentalmanager - Optionally put Nginx or Caddy in front as a reverse proxy to handle HTTPS.
First-Run Setup
On the very first launch RentalManager detects that no administrator account exists and automatically redirects every request to /account/setup.
-
Create your Admin account
Enter your full name, email address, and a password (minimum 8 characters, at least one uppercase letter and one digit). Click Create Account. - You are now logged in as Administrator. The dashboard opens immediately — no separate login step needed.
-
Activate your license (optional during trial)
Navigate to Admin → License in the sidebar. Enter your license key and the email address associated with your purchase, then click Activate. A green confirmation banner confirms success. -
Add your first property
Click Properties & Units in the left sidebar and then New Property.
Using the Application
Adding a Property and Its Units
- Go to Properties & Units → New Property.
- Fill in the property name, address, city, state, and ZIP. Save.
- On the property row click the Units icon to open the units list for that property.
- Click Add Unit — enter the unit number, monthly rent, tenant name (if occupied), and check Occupied.
Logging a Repair
- Go to Repairs → New Repair.
- Select the property and unit, enter a descriptive title, and choose the category and priority.
- Optionally enter an estimated cost and vendor name. Save.
- As work progresses, open the repair and change the status to In Progress, On Hold, or Completed. The completion date is filled in automatically when you mark a repair complete.
- You can attach expenses and documents directly to a repair from its detail page.
Recording an Expense
- Go to Expenses → Add Expense.
- Select the property, enter a description, date, amount, category, and payment method.
- If the expense is tax-deductible check the Tax Deductible box — it will be included in the Reports summary.
- To attach a receipt, save the expense first and then re-open it to use the receipt upload section.
Logging a Mileage Trip
- Go to Mileage Log → Log Trip, or click the Log Trip button on the Dashboard banner.
- Select the property (and optionally the unit), enter the start and end locations, miles driven, and purpose.
- Check Round Trip if you drove both ways — the total miles (and deduction) will be doubled.
- The IRS deduction at $0.70/mile is shown immediately on save.
Uploading Documents & Photos
- Go to Documents.
- Expand the Upload Documents / Photos panel.
- Select a property and (optionally) link to a repair. Choose a category and add comma-separated tags.
- Click Choose Files to Upload — you can select multiple files at once. Supported types: images, PDF, Word, Excel, and plain text. Maximum 50 MB per file.
- Images appear in the photo grid below; other file types appear in the files table where they can be previewed inline or downloaded.
Running a Tax Report
- Go to Reports.
- Select the tax year. Optionally filter to a single property.
- The left card shows your mileage deduction summary; the right card shows your expense summary by category.
- The green banner at the bottom shows the combined estimated deduction — mileage plus tax-deductible expenses. Share this number with your accountant.
Administration
Managing Users
Administrators can manage user accounts at Admin → Users (only visible to users with the Admin role).
- Invite a new user: Click New User, enter their full name, email, a temporary password, and select their role (Admin or User).
- Disable a user: Toggle the Active switch on their row. Disabled users are immediately signed out and cannot log back in.
- Reset a password: Click the edit icon on their row and enter a new password.
Activating or Changing Your License
- Go to Admin → License.
- The current status shows your tier, expiry date (or “Perpetual”), and how many properties and users you are using vs. your limit.
- To activate a new key, enter it in the License Key field along with your registered email, then click Activate.
Backing Up Your Data
All application data is stored in two places:
RentalManager.Web/rental_manager.db— the SQLite database (all records, users, settings)RentalManager.Web/receipts/andRentalManager.Web/documents/— uploaded files organized by year
To back up, simply copy these files to a safe location. To restore, replace them with your backup copies and restart the application.
robocopy or xcopy command nightly. On Linux, a cron job with cp or rsync works well.
Updating to a New Version
- Back up your data (see above).
- Stop the running application.
- Replace the application files with the new release.
- If the release notes mention database schema changes, delete
rental_manager.db— only after backing it up. The app will recreate the schema on next launch. - Start the application and verify everything loads correctly.
Questions or issues? Open a ticket in the support portal or email support@example.com.
© 2024 RentalManager. All rights reserved.